
I have been perusing Pinterest to get some ideas for more DIY baby projects (check out my baby mobile here), and let me tell you there are a ton of ideas on there, and that get's me excited! What would I do without Pinterest? I It's such a great place for inspiration, but let's be honest, I don't use it enough.
First up - bibs considering LB spits up ALOT, and if I was a good mother, I would change his clothes every time they got soaked with spit up, but if that were the case, LB would go through at least 5 outfits a day! So instead of changing his clothes, I force him to wear a bib like an old person in order to protect his clothes from the massive amounts of milk that come pouring out of his mouth. I'm making it sound a whole lot worse than it actually is, but a day doesn't go by that he doesn't soak the neck of his outfit with his beverage of choice. And yes, he has grown, but he is still so small - so any and all bibs look gigantic on him. I have found a few that are teeny tiny, but that just gives his spit up more room to cover his clothes.
So when my friend Rachel handed off this little bandana bib to me (that she made), I got all excited! I mean they couldn't be that hard to make could they?? And it wouldn't cost that much to make them considering all you need is some fabric and a button/velcro, and yes, a sewing machine would be nice, but I did find a tutorial for no sew bibs. And making them would save me from having to buy more bibs for LB considering he goes through at least 2-3 bibs a day. And it certainly wouldn't hurt to add a few more bibs to his collection. However, I still don't have a sewing machine in my possession, so it gives me a good excuse to spend time with those who do.
And this bandana bib is so cute! See LB modeling it below. This series of photos just makes me laugh - I just imagine him saying..."Look at my new bib!...I love it. I'll be so sad if you take it away from me. (cue spit up all over the bib). Mom, (while wailing) I said don't take it away from me!" Can't wait till LB can actually TALK, but in the meantime, we are cherishing our wordless moments and filling in the blanks for him.
First up - bibs considering LB spits up ALOT, and if I was a good mother, I would change his clothes every time they got soaked with spit up, but if that were the case, LB would go through at least 5 outfits a day! So instead of changing his clothes, I force him to wear a bib like an old person in order to protect his clothes from the massive amounts of milk that come pouring out of his mouth. I'm making it sound a whole lot worse than it actually is, but a day doesn't go by that he doesn't soak the neck of his outfit with his beverage of choice. And yes, he has grown, but he is still so small - so any and all bibs look gigantic on him. I have found a few that are teeny tiny, but that just gives his spit up more room to cover his clothes.
So when my friend Rachel handed off this little bandana bib to me (that she made), I got all excited! I mean they couldn't be that hard to make could they?? And it wouldn't cost that much to make them considering all you need is some fabric and a button/velcro, and yes, a sewing machine would be nice, but I did find a tutorial for no sew bibs. And making them would save me from having to buy more bibs for LB considering he goes through at least 2-3 bibs a day. And it certainly wouldn't hurt to add a few more bibs to his collection. However, I still don't have a sewing machine in my possession, so it gives me a good excuse to spend time with those who do.
And this bandana bib is so cute! See LB modeling it below. This series of photos just makes me laugh - I just imagine him saying..."Look at my new bib!...I love it. I'll be so sad if you take it away from me. (cue spit up all over the bib). Mom, (while wailing) I said don't take it away from me!" Can't wait till LB can actually TALK, but in the meantime, we are cherishing our wordless moments and filling in the blanks for him.

And some other bib ideas for inspiration that I gathered from pinterest!
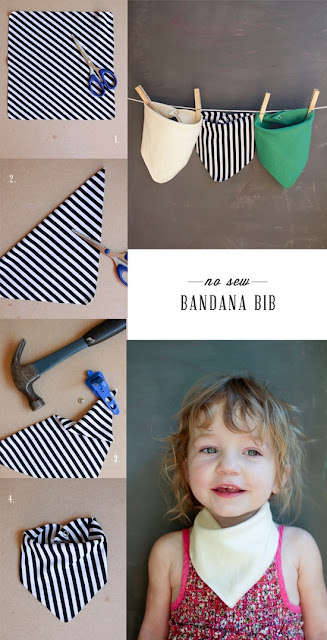
via pinterest - don't even need a sewing machine!


So on Friday, I have a bib making date with Rachel and I promise to post photos of the finished products. Happy DIYing! What baby items have you made? I would love to hear from you!
xoxo,
Malia


